Domain authentication gives your email address a traceable identity. It shows your recipients’ providers that you are an ‘authorized sender’ and not a spammer or someone engaged in phishing.
To put it simply, domain authentication makes clear that your sender address is reliable.
Why is domain authentication so important?
Domain authentication keeps your email messages away from spam and anti-phishing filters and helps improve your delivery rates.
But that’s not all.
The domain authentication procedure also makes your emails look more professional. Recipients will see your email address in their inboxes, not a phrase like: ‘Sent by Emailchef on behalf of YourName@yourdomain.com’. That builds trust.
And if you’re a medium or large-scale sender, domain authentication is essential. It’s now one of the new requirements set by Google and Yahoo for anyone sending 5000 or more messages per day to Gmail or Yahoo users.
So how do you authenticate your domain?
To properly set up domain authentication, you need to insert data called DKIM, SPF, and DMARC into your domain’s administration panel.
This is a delicate procedure. If you’re not sure what you’re doing, you can always ask your hosting service to do it for you.
Just copy and paste the contents of the box below and send it to your domain provider’s customer service. Your provider will configure the authentication parameters for you, and you can be confident the process will work.
I would like to set my DNS records with the following parameters:SPF record:
v=spf1 a mx include:spf.emailchef.com ?all
DomainKey/DKIM record (TXT type):
mailchef._domainkey
k=rsa; p=MIGfMA0GCSqGSIb3DQEBAQUAA4GNADCBiQKBgQDT3MWLni6so1q9eQggRYBCLHFjohZkCnYHH8gZNDBm6zRrodRVpWpJQW7x3cWWiuBhS1X0IfBB80l5tqFa+yc+mVgnk8tkUzOHFbPQPp4fi7egTpMtsQW/ZMrxw73SItNvPr72qvJTYZNPxarMx+ULjEWybcfEdXHPY8jslGcpCwIDAQAB
DMARC record:
_dmarc
v=DMARC1; p=none;
Many Thanks,
Best Regards.
How to set up your domain yourself
If you prefer to set up the SPF, DKIM, and DMARC records yourself, you’ll need to access the DNS panel of your domain provider and enter the following parameters.
SPF record
For each domain, you can set a maximum of one SPF parameter. You have two options:
- If an SPF parameter has already been added to your domain, you only need to modify it by adding Emailchef. Insert:
include:spf.emailchef.comafter thev=spf1string.
Make sure you include a space before and after the added portion. - If the SPF is not present, you’ll need to create a TXT record to add to your email address domain (yourdomain.com).
The record you’ll need to insert is:
v=spf1 a mx include:spf.emailchef.com ?all
DomainKey/DKIM record
The DKIM record must be added to the subdomain ‘mailchef._domainkey’. Like the SPF, the DKIM record can also be inserted as a TXT record.
The record to be inserted under Domain is:
mailchef._domainkey
Under Value, you’ll need to enter:
k=rsa; p=MIGfMA0GCSqGSIb3DQEBAQUAA4GNADCBiQKBgQDT3MWLni6so1q9eQggRYBCLHFjohZkCnYHH8gZNDBm6zRrodRVpWpJQW7x3cWWiuBhS1X0IfBB80l5tqFa+yc+mVgnk8tkUzOHFbPQPp4fi7egTpMtsQW/ZMrxw73SItNvPr72qvJTYZNPxarMx+ULjEWybcfEdXHPY8jslGcpCwIDAQAB
DMARC record
The record to be inserted under Domain is:
_dmarc
The Value field of the DMARC record can be initially configured as follows:
v=DMARC1; p=none;
DMARC tells recipients’ mailboxes what to do with messages that fail SPF and DKIM validations.
The parameters above create a permissive DMARC record, but their implementation alone ensures compliance with the requirements for proper delivery.
However, the DMARC record will need to be adjusted over time.
This instruction will initially be permissive but will become increasingly stringent after a period of traffic analysis — typically, a few months.
A strict DMARC policy may block legitimate company emails sent through a wrong channel or that aren’t properly configured.
A very restrictive DMARC policy should only be used after completing all internal checks, ensuring that all outgoing emails pass through authorized services listed in the SPF record.
DMARC is typically managed directly by the company and not by an external provider.
How to verify if the authentication has been successful.
After setting up the SPF, DKIM, and DMARC parameters, you can check the values have been correctly inserted by accessing your profile and clicking on Settings > Domain Authentication.
Next, click the Check Domains button.
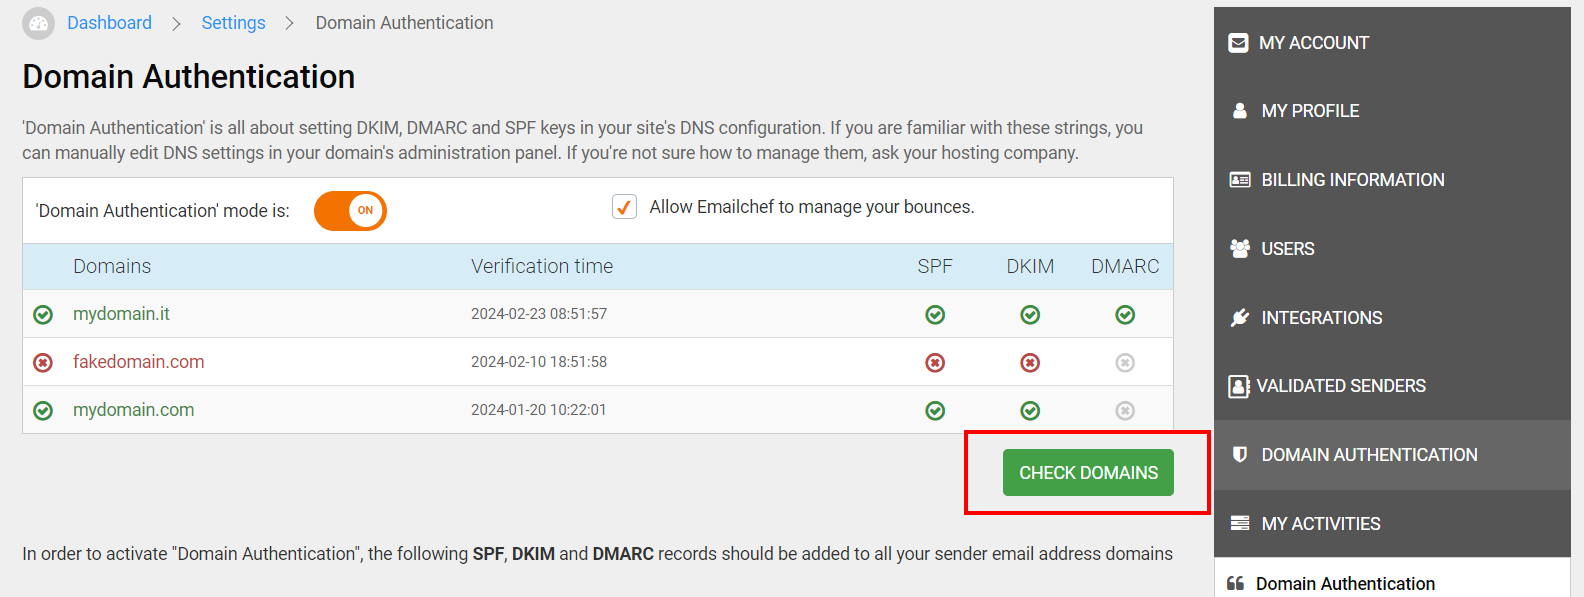
If your domain has been successfully verified, a green checkmark will appear next to each record (SPF, DKIM, and DMARC).
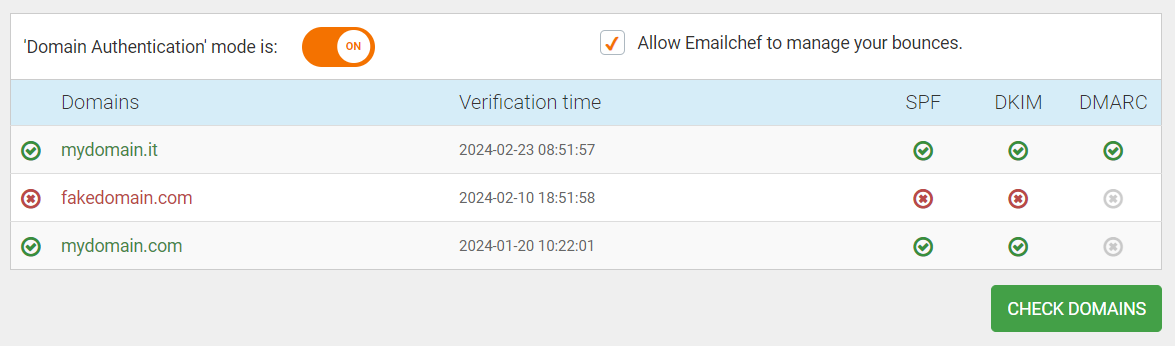
Once you have successfully verified your domain, you can activate authentication using the on/off switch on the page.


Emailchef handles your bounces to provide you with comprehensive statistics. However, you can receive all the bounces generated from your lists directly to your mailbox by disabling the Allow Emailchef to manage your bounces option.

Do you need assistance with authenticating your domain?
Write a ticket to our customer service specifying ‘Domain Authentication’ in the subject line.